

TIG225X AC/DC TIG Welder With Pulse

TIG225X AC/DC TIG Welder With Pulse

TIG225X AC/DC TIG Welder With Pulse

TIG225X AC/DC TIG Welder With Pulse

TIG225X AC/DC TIG Welder With Pulse

TIG Torch

Foot Pedal

Clamps

Regulator

Consumables
WHAT YOU NEED TO KNOW
The PrimeWeld TIG225X AC/DC TIG Welder with Pulse is built for welders who need precision, versatility, and durability. With advanced AC waveform selection, pulse TIG functionality, spot welding capability, and expanded welding controls, the TIG225X delivers professional-grade results across a wide range of projects—from automotive bodies and fencing to sculptures and custom fabrications.
Renowned for its clean, beautiful weld beads, TIG welding is the process of choice for exposed joints like bicycle frames, street rods, water tanks, and metal furniture. With selectable AC Square Wave, Sine Wave, and Triangle Wave modes, the TIG225X gives welders greater control over arc characteristics and weld performance across a variety of materials and applications.
Designed for real-world performance, this machine combines rugged reliability with advanced features such as Hot Start, Arc Force, Anti-Stick protection, VRD safety, and Smart Fan technology. Like every PrimeWeld machine, it's backed by a 3-Year No-Hassle Warranty and legendary U.S.-based support.
Quick Highlights
- NEW: AC Square, Sine & Triangle Waveforms – tailor arc characteristics for penetration, weld appearance, and heat control
- Pulse TIG Control – fine-tune penetration, heat input, and bead appearance
- NEW: Spot Welding Mode – create consistent tack welds and timed welds with precision
- 3-Year Warranty + U.S. Support – unmatched peace of mind
Versatile Welding Options
- Switch easily between AC/DC TIG and Stick (MMA) modes
- Weld materials up to ½ inch thick
- Pulse TIG mode delivers exceptional control on aluminum projects
Advanced TIG Controls
NEW: AC Waveform Selection
Choose between AC Square Wave, AC Sine Wave, and AC Triangle Wave modes to optimize arc characteristics for different aluminum welding applications.
Pulse TIG Welding
Fine-tune arc characteristics with adjustable pulse duty and frequency. Control weld bead shape, penetration, and heat input for professional results.
AC Balance Feature
Adjust the AC cycle to clean oxidation and improve control when welding aluminum.
High-Frequency Arc Start
Ignite the arc without touching the workpiece for precise, contamination-free starts.
NEW: Spot Welding Mode
Create consistent timed welds for repeatable tacking and uniform joints.
Customizable Arc Parameters
- Start/end current tapering
- Up/down slope control
- Background current settings
- AC frequency adjustment
Stick Welding Made Simple
Stick Mode for Quick Action
Move from TIG finesse to rugged DC Stick welding — perfect for fencing, equipment repairs, and outdoor jobs.
NEW: Hot Start, Arc Force & Anti-Stick
Improve arc starts, maintain arc stability, and help prevent electrode sticking for a smoother stick welding experience.
Quality Accessories
Includes a stinger clamp for added reach and usability.
Protection & Reliability
- NEW: VRD Safety – reduces open-circuit voltage when idle
- NEW: Smart Fan Technology – runs only when needed to reduce noise and limit dust intake
- Overcurrent, overheating, and voltage spike protection
- Built-in shielding gas solenoid
- Dinse connectors and water cooler compatibility
Ease of Use
- Ready to weld right out of the box — accessories included
- Foot pedal amperage control for hands-free precision
- 2T/4T torch trigger lock for comfortable extended welds
- Digital display for easy settings management
-
Input Voltage: 120V / 240V, Single-Phase, 50/60 Hz
-
Output Range: TIG 10–225A / Stick 10–180A
-
Duty Cycle (TIG): 40% @ Max Output, 100% at 108A (120V) / 155A (240V)
-
Duty Cycle (Stick): 40% @ Max Output, 100% at 76A (120V) / 139A (240V)
-
Pulse Frequency: 0.5–200 Hz
-
AC Balance: 10–90%
-
AC Frequency: 40–200 Hz
-
AC Waveforms: Square Wave, Sine Wave, Triangle Wave
-
Spot Welding Mode: Yes
-
Stick Features: Hot Start, Arc Force, Anti-Stick
-
VRD Safety: Voltage Reduction Device (VRD)
-
Smart Fan: Fan-on-Demand Technology
-
Gas Flow Settings: Pre-Flow 0.1–3 sec / Post-Flow 0–15 sec
-
Torch Control: 2T / 4T Trigger Modes
-
Foot Pedal Compatible: Yes
-
Weight: 41 lbs (18.5 kg)
-
Dimensions: 20.5 × 11.8 × 21.5 in
-
Warranty: 3-Year No-Hassle Warranty
For complete specifications, setup instructions, and operating parameters, download the User Manual below.
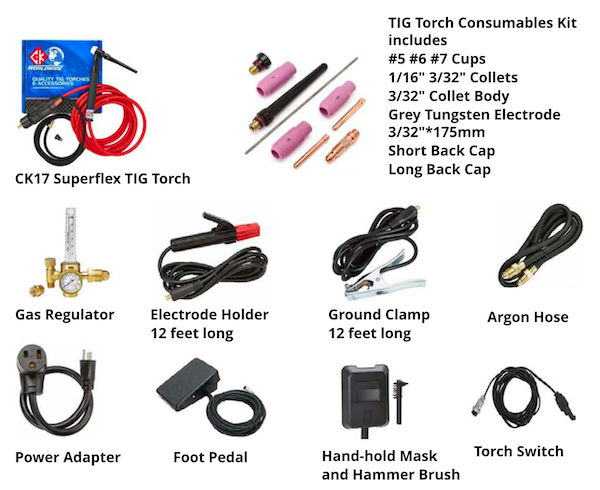
Everything you need to start welding is in the box:
Premium Accessories
-
CK Worldwide Superflex TIG Torch – You choose your model (CK17, CK20, or CK26) and cable length (12.5 ft or 25 ft) at checkout. All options feature Superflex hose and CK Dinse connector.
-
Foot Pedal Amperage Controller – hands-free precision control
-
Gas Regulator – reliable argon flow
Cables & Clamps
-
Ground Clamp – 12 ft cable
-
Electrode Holder – 12 ft cable
-
Argon Hose
-
220V to 110V Power Adapter
Consumables Kit
-
Cups: #5, #6, #7
-
Collets: 1/16", 3/32"
-
3/32" collet body
-
Grey tungsten electrode (3/32" × 175 mm)
-
Short back cap and long back cap
Extras
-
Torch Switch
-
Hand-Held Welding Mask
-
Hammer Brush
-
User Manual
-
Quick Setup – comes with CK Worldwide Superflex torch, foot pedal, regulator, and consumables so you can start welding out of the box.
-
Simple Controls – digital display, 2T/4T trigger modes, and clear selector switches make it easy to dial in your settings.
-
Foot Pedal Precision – hands-free amperage adjustment for maximum control.
-
Switch Welding Modes Fast – flip between TIG and Stick with a single switch.
-
Shielding Gas Management – built-in solenoid plus pre-flow/post-flow controls protect weld quality.
-
Clean Starts, Clean Finishes – high-frequency arc start prevents contamination, while current tapering gives you smooth weld terminations.
Selector Switches

1. ON/OFF
Turns the machine on or off. (Located on the back of the TIG225X.)
2. TIG / MMA Selector
Switch between TIG welding and Stick (MMA) welding.
-
TIG position → TIG welding mode.
-
MMA position → DC Stick welding mode.
3. AC / DC Selector
Choose AC or DC current when in TIG mode.
-
AC position → For aluminum and magnesium (removes oxidation).
-
DC position → For steel, stainless, and most other metals.
4. 2T / 4T Torch Mode
Controls how the torch trigger behaves:
-
2T Mode → Press and hold to weld, release to stop.
-
4T Mode → Four-step process for long welds:
-
Press to start current
-
Release to weld
-
Press to start downslope
-
Release to stop welding
-
5. Pulse Mode (OFF / LOW / HIGH)
Controls pulsed TIG welding frequency:
-
OFF → Standard (non-pulse) TIG welding.
-
LOW → 0.5–10 Hz pulse frequency.
-
HIGH → 10–200 Hz pulse frequency.
6. Water Cooler Power Outlet
110/220V outlet for an optional dual-voltage water cooler (max 4A).
-
Matches the welder’s input power (110V input → 110V output; 220V input → 220V output).
-
⚠️ Do not power other devices with this outlet.
-
If using a single-voltage cooler, unplug it when running on a mismatched input voltage to avoid damage.
Control Dials

A. Welding Current
Sets the main welding current (amperage).
-
Range: 10–225A (220V) / 10–140A (110V)
B. Pre-Flow
Controls shielding gas flow before the arc starts, protecting the tungsten and weld start.
-
Range: 0.1–3 seconds
C. Start Current
Initial current when striking the arc.
-
Higher → easier arc start
-
Lower → prevents burning thin sheet metal
-
Range: 10–225A (220V) / 10–140A (110V)
D. Up Slope
Controls how quickly current rises from start current to main welding current.
-
Range: 0–10 seconds
E. Base Current
Background current level during pulse welding, expressed as a % of peak current.
-
Example: Peak at 100A, base at 20% → output cycles between 100A and 20A.
-
Range: 5–95%
F. Pulses Per Second (Hz)
Sets how often current switches between peak and base levels in Pulse mode.
-
Range: 0.5–10 Hz (Low) / 10–200 Hz (High)
G. Pulse Duty (Balance of Peak vs Base Current)
Controls penetration depth and heat input.
-
Higher duty → deeper penetration, more heat
-
Lower duty → less heat, safer for thin material
-
Range: 10–90%
H. Down Slope
Controls how quickly current drops from welding current to end current.
-
Range: 0–25 seconds
I. End Current
Current at the end of the weld, allowing crater fill before arc extinguishes.
-
Range: 10–225A (220V) / 10–140A (110V)
J. Post Flow
Controls shielding gas flow after the arc stops, protecting weld and tungsten while cooling.
-
Range: 0–15 seconds
K. AC Frequency
Adjusts arc cone width and stability in AC TIG mode.
-
Range: 40–200 Hz
L. AC Balance
Controls the balance between cleaning (positive half) and penetration (negative half) when welding aluminum or magnesium.

Front Control Panel
The TIG225X's intuitive front interface gives you access to pulse control, AC balance, start/end amps, and more — so you can dial in every detail of your weld.

Dual View: Front + Rear
From dual voltage input to smart fan placement, this machine is engineered for both performance and durability in your shop or garage.

Power Input + Cooling
With dynamic cooling fans and 120/240V input support, the TIG225X adapts to your workspace and protects your investment for the long haul.

Everything You Need
Includes regulator, foot pedal, TIG torch, gas hose, and starter consumables — everything you need to start welding day one.
Front Control Panel
The TIG225X's intuitive front interface gives you access to pulse control, AC balance, start/end amps, and more — so you can dial in every detail of your weld.
Dual View: Front + Rear
From dual voltage input to smart fan placement, this machine is engineered for both performance and durability in your shop or garage.
Power Input + Cooling
With dynamic cooling fans and 120/240V input support, the TIG225X adapts to your workspace and protects your investment for the long haul.
Everything You Need
Includes regulator, foot pedal, TIG torch, gas hose, and starter consumables — everything you need to start welding day one.

See the PrimeWeld TIG225X AC/DC TIG Welder in action.
Check out this glowing PrimeWeld TIG 225X AC/DC TIG Welder review video from the renowned "The Fabrication Series" on YouTube with over 657K subscribers and counting!
0 Items in your cart
Subtotal $0
Tax and shipping will be calculated at checkout.
Your shopping cart is empty.